OPERATION CARBON KING v3
Mission design by: Goldshe & Dutch Baron
SITUATION:
On December 29, 1030D, multiple USA Reaper drones orbiting over no-man’s land between Zugdidi and Sukhumi discovered a sizeable Russian forward recon unit (codenamed Romeo) across the river approximately 5 kilometers North of Dzhvari and another, considerably larger and more powerful unit (codenamed Juliet) between Ochamchira and Gali.
The US, threatened by this presence, immediately responded by deploying a unit of armor and infantry seven kilometers South of Dzhvari, and launching drone strikes upon Romeo.
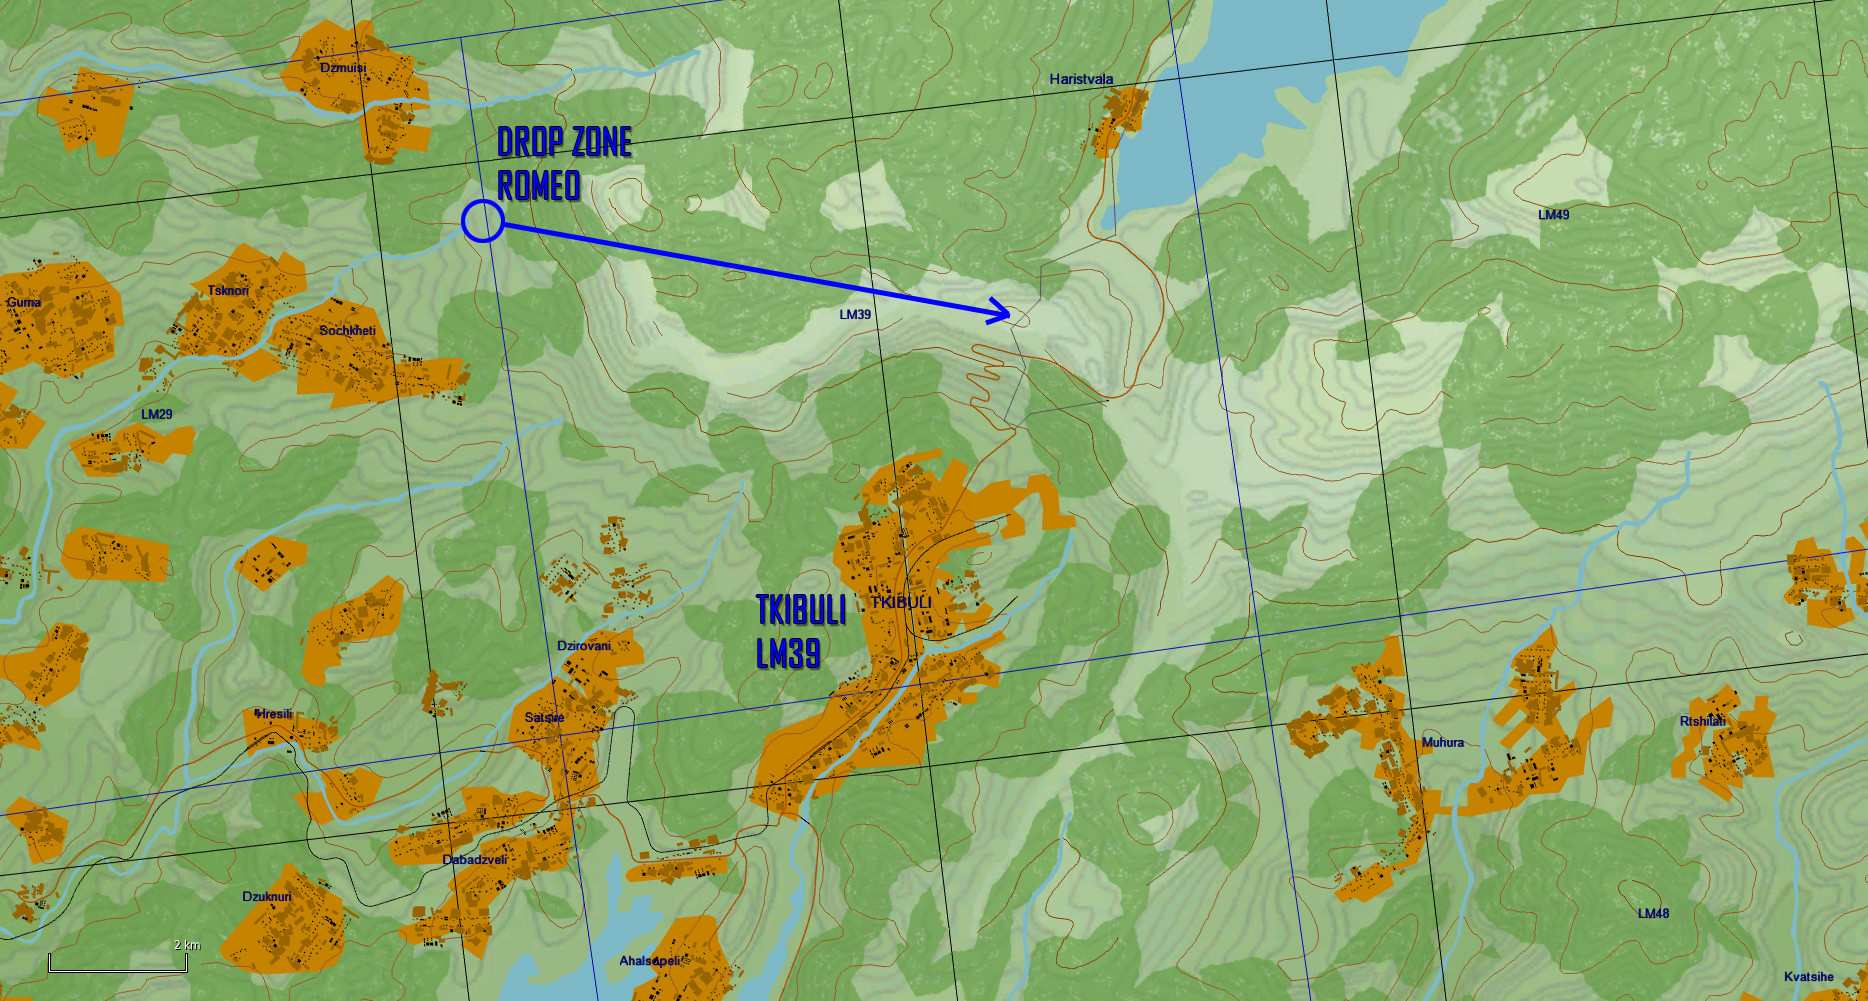
The Russians reacted by mobilizing, moving further up North, and taking a defensive position in and around a small town ten kilometers north of Dzhvari, deploying anti-air defenses. This resulted in a stalemate.
Two hours later, 1200D, the Reaper drones orbiting the area monitored extensive Russian movements. Romeo dispatched some of it’s armor, infantry and AAA down South, resulting in fortification of the bridge connecting both Russian units. Juliet advanced further East and took position between Gali and Dzhvari.
Romeo does not exhibit any signs of retreat, Juliet is rather setting up an attempt of reuniting with Romeo and taking Dzhvari and therefore gaining significant power and presence across the river, this resulting in an opportunity of taking and fortifying Gudauta and Sukhumi airports, as well the land before the river.
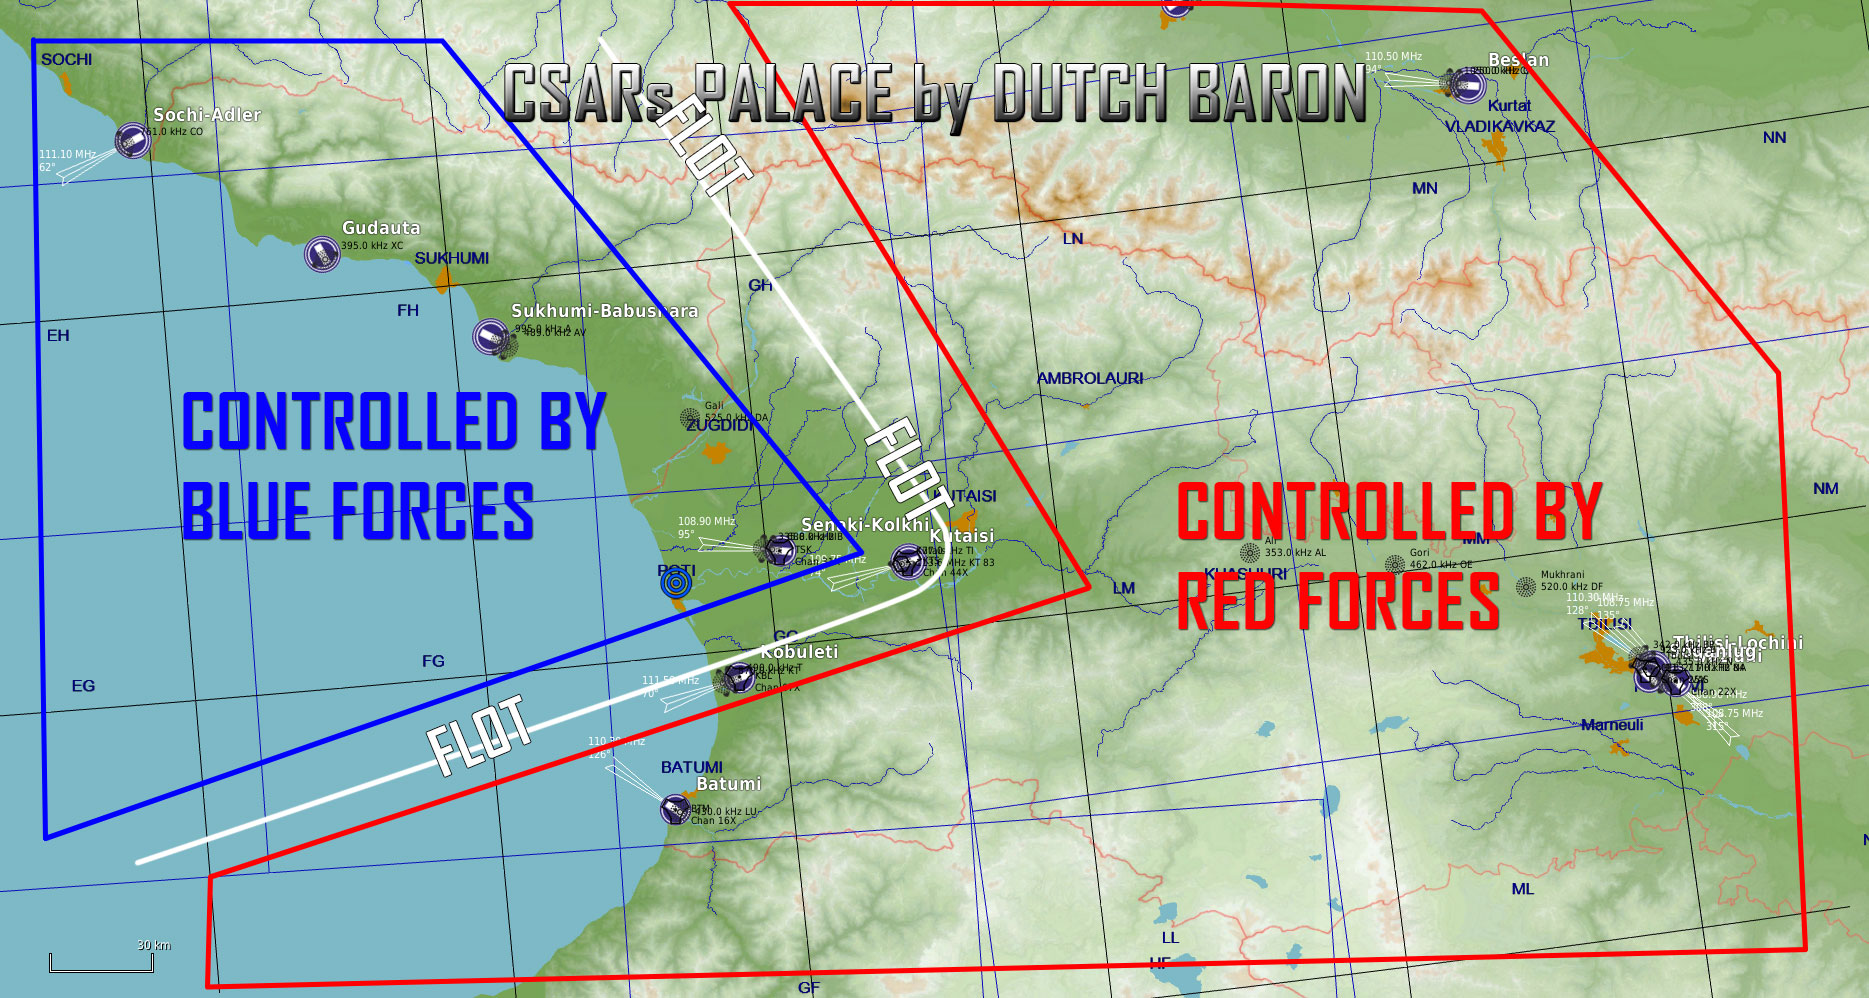
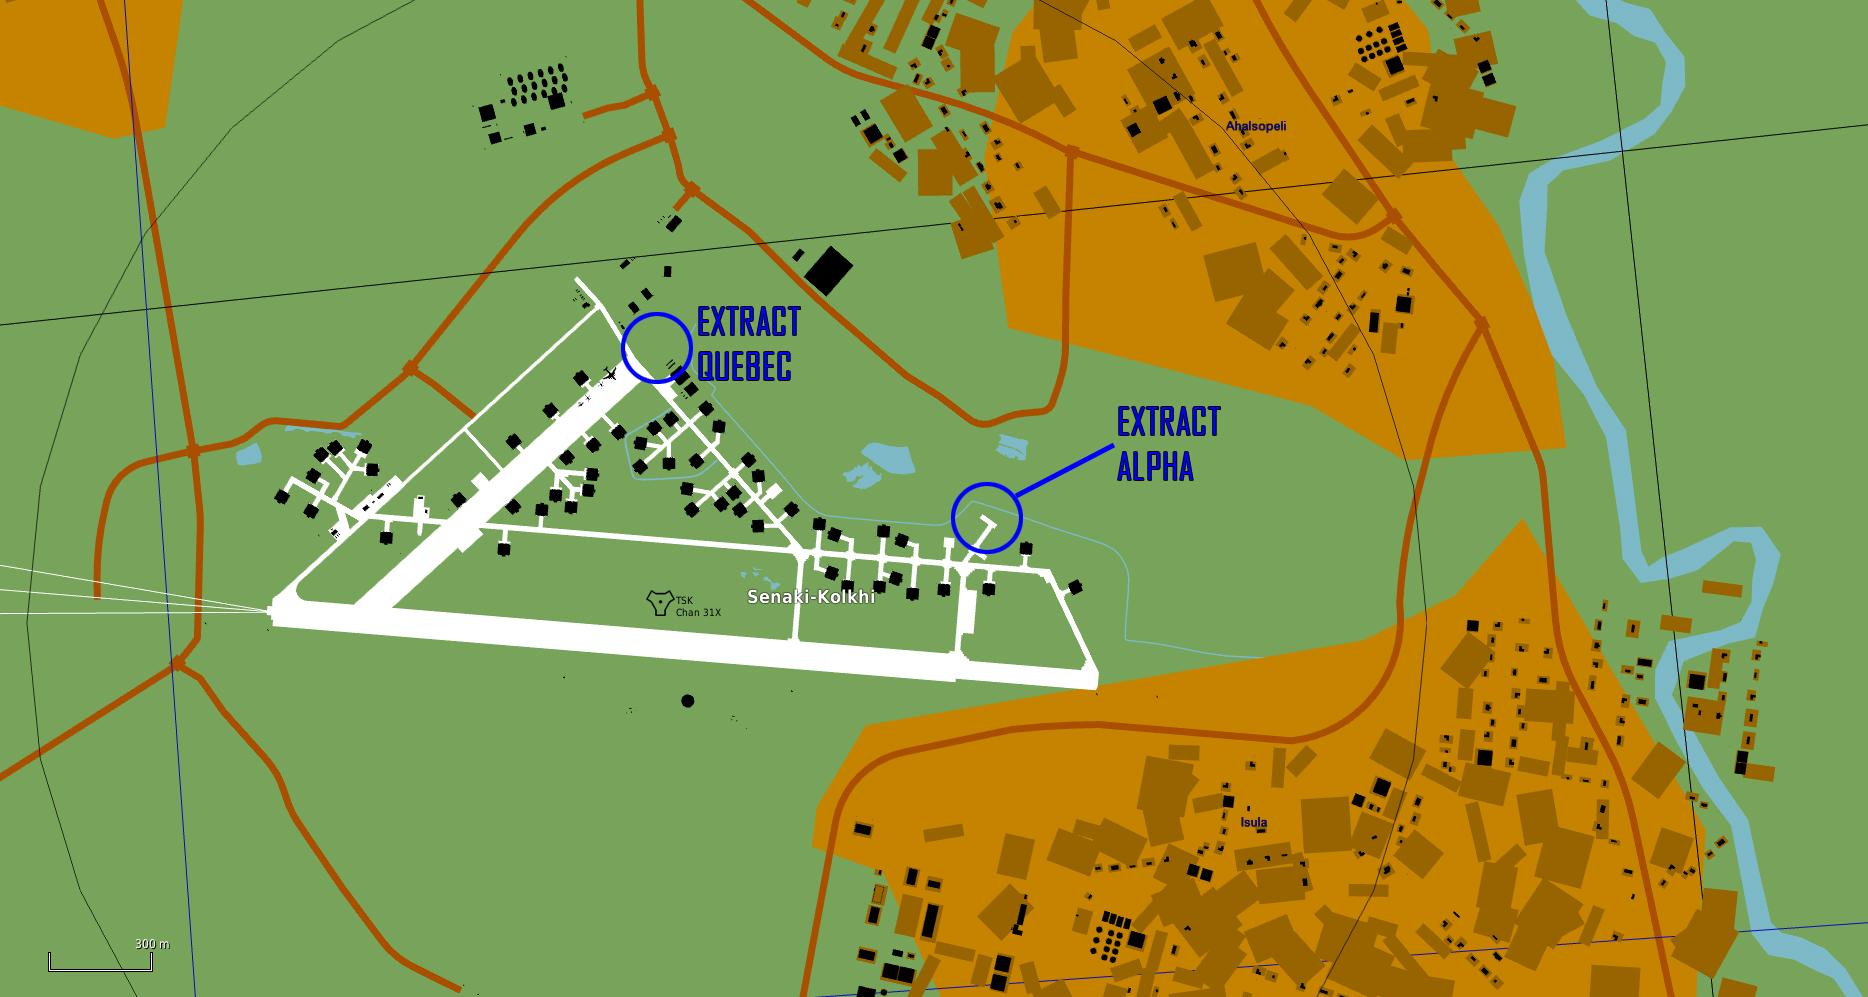
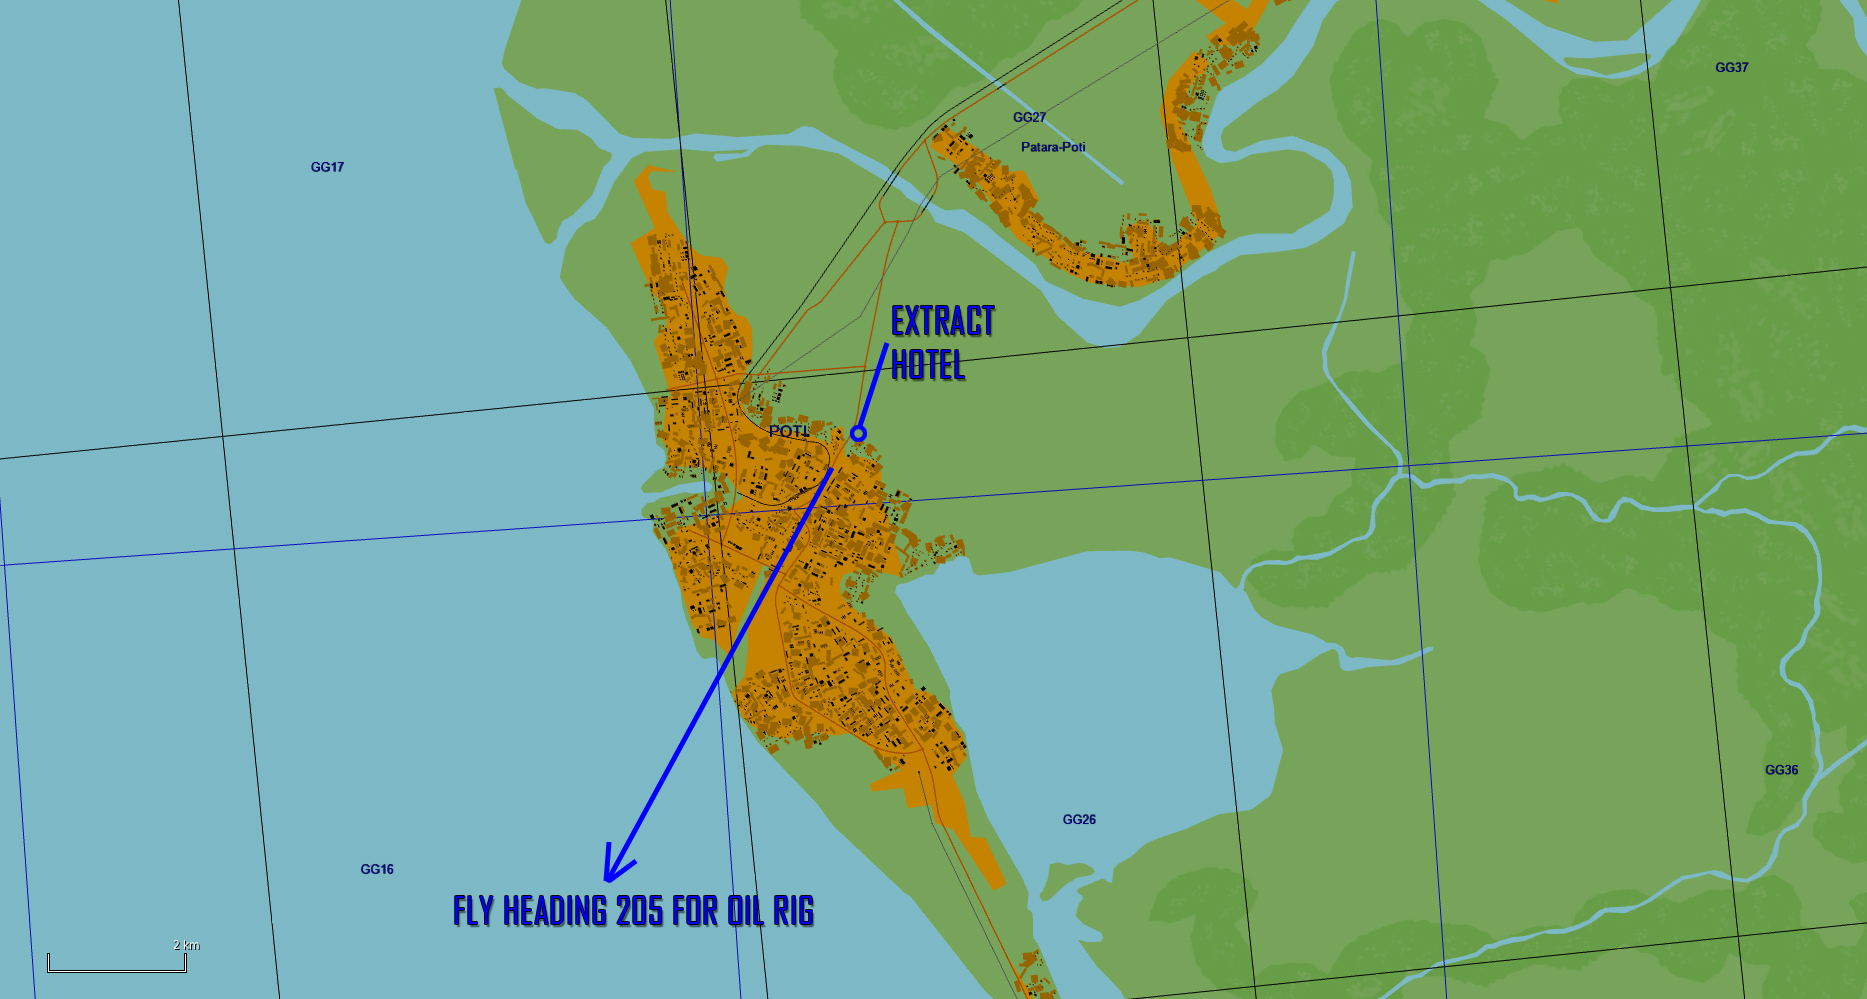
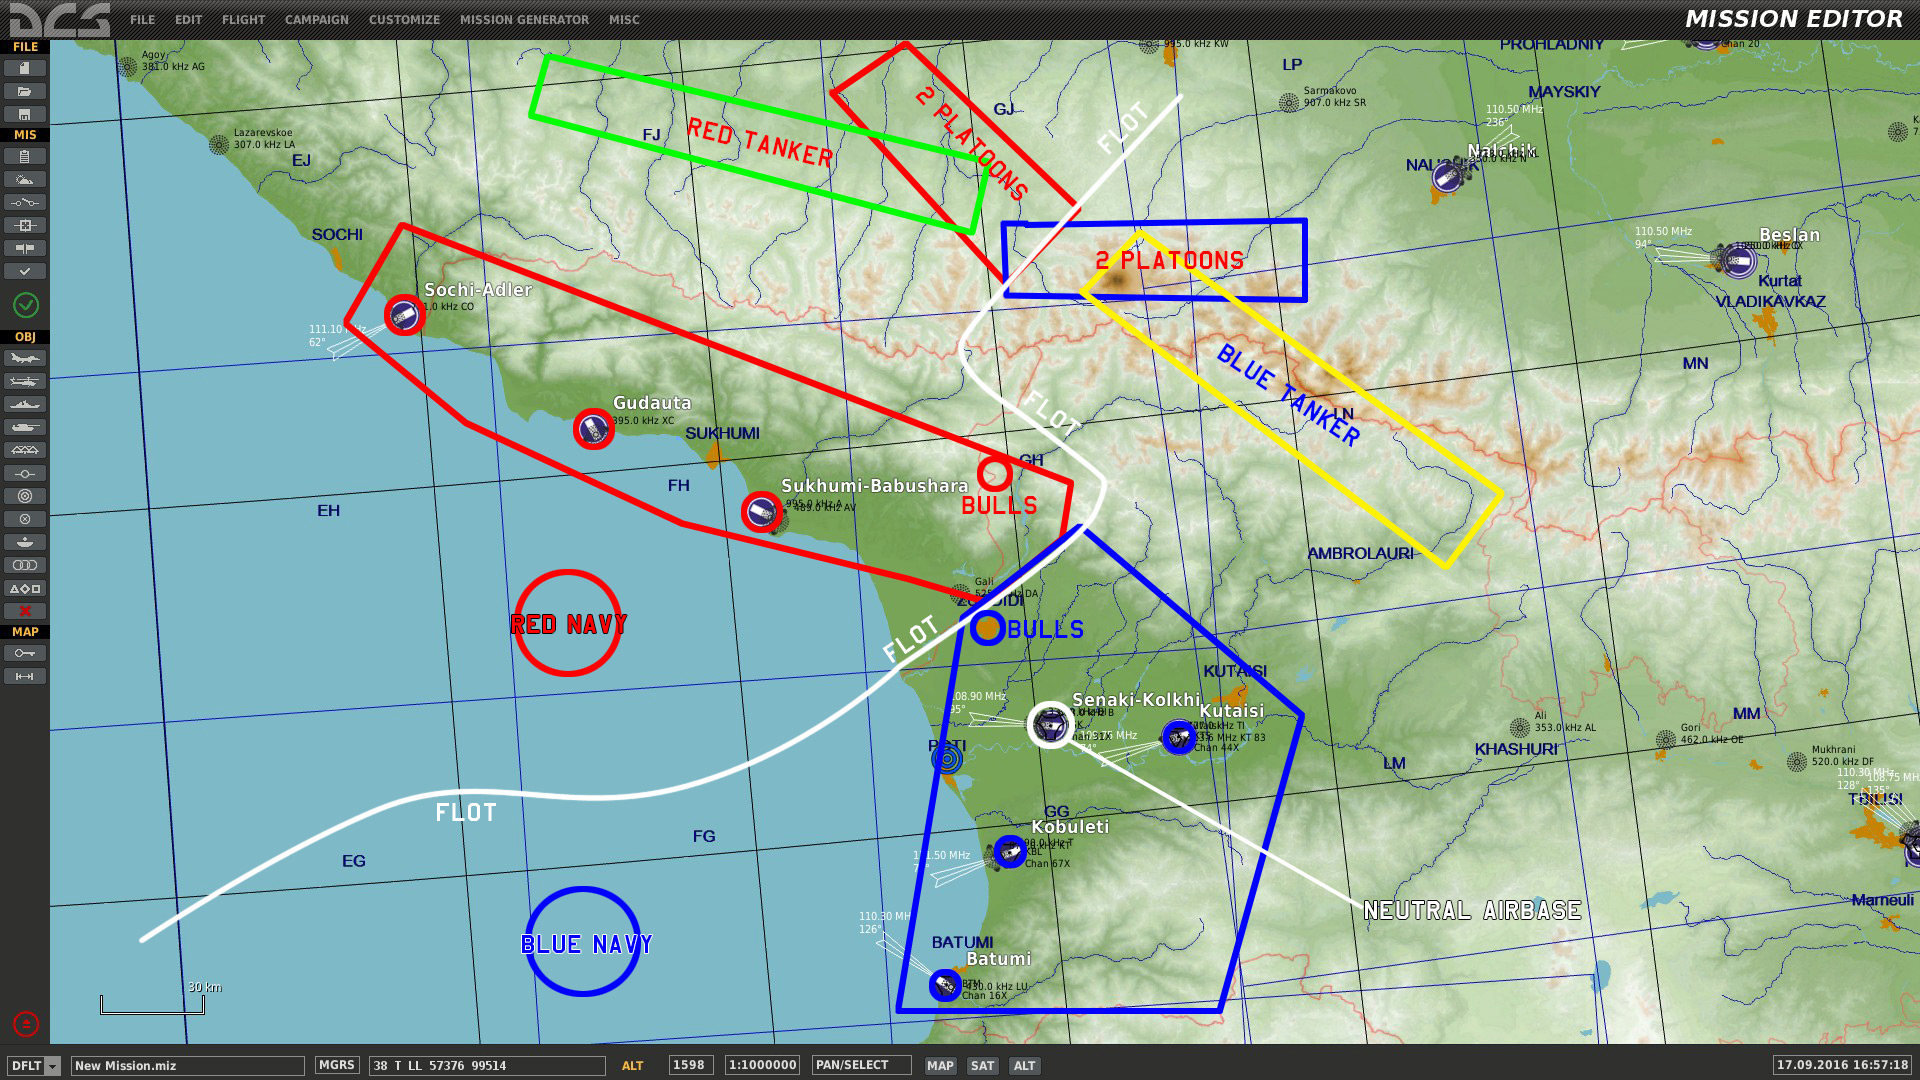
The BLUFOR have a full F-15 Squadron in Batumi, full A-10 squadron in Kobuleti and a Ukranian presence with multiple Su-27, MiG-29, Su-25, Ka-50 in Kutaisi. The BLUFOR also control Senaki-Kolkhi airport with no aircraft present, if need be to land, refuel and repair.
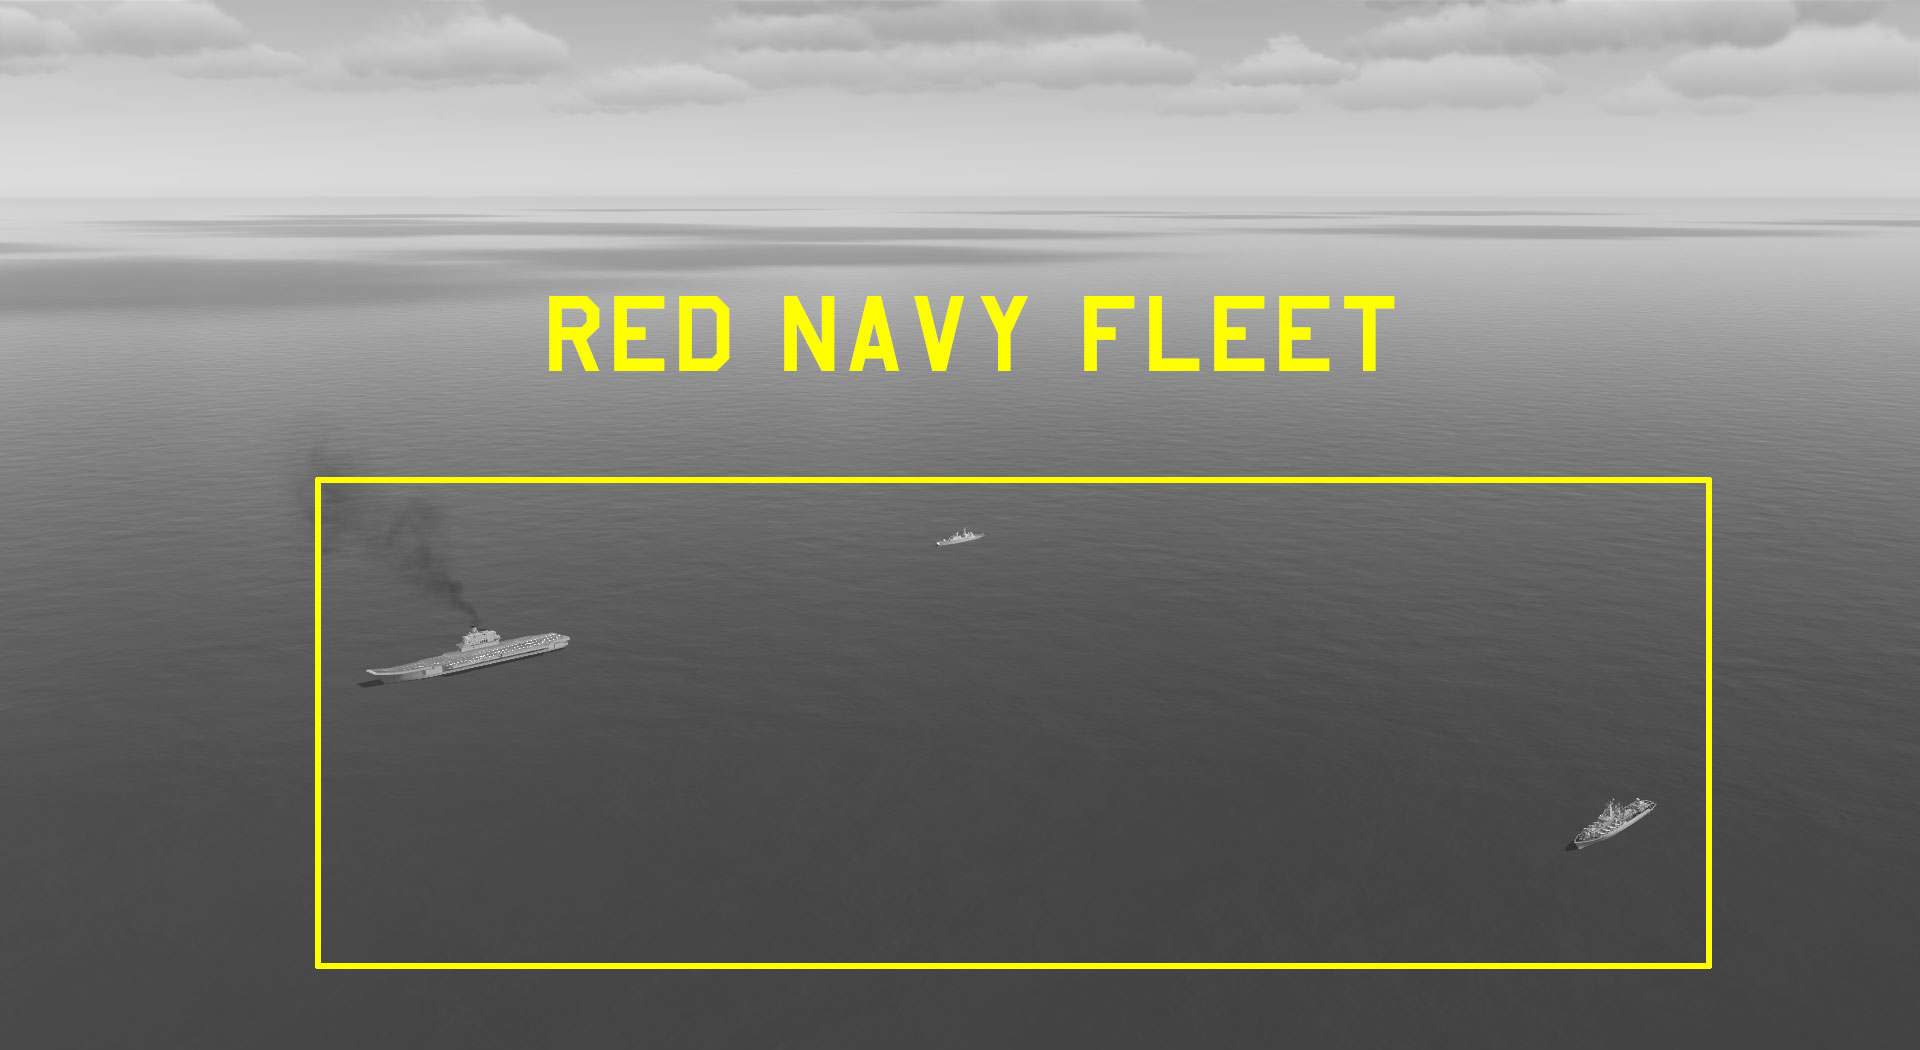
The OPFOR have a sizeable fighter presence in Sochi-Adler and Nalchik. CV Admiral Kuznetsov has taken position 60 kilometers off the coast of Sukhumi, allowing Russians to deploy naval missions.
Romeo: Russian forward recon unit consisting of infantry, multiple BTR-80s, T-80s, ZU-23s, Shilkas and a single Tunguska. Expect the Tunguska to be deeper North, in a clearing close to forest.
Note: The aerial reconnaissance drones confirmed all Shilkas being dispatched to protect the bridge.
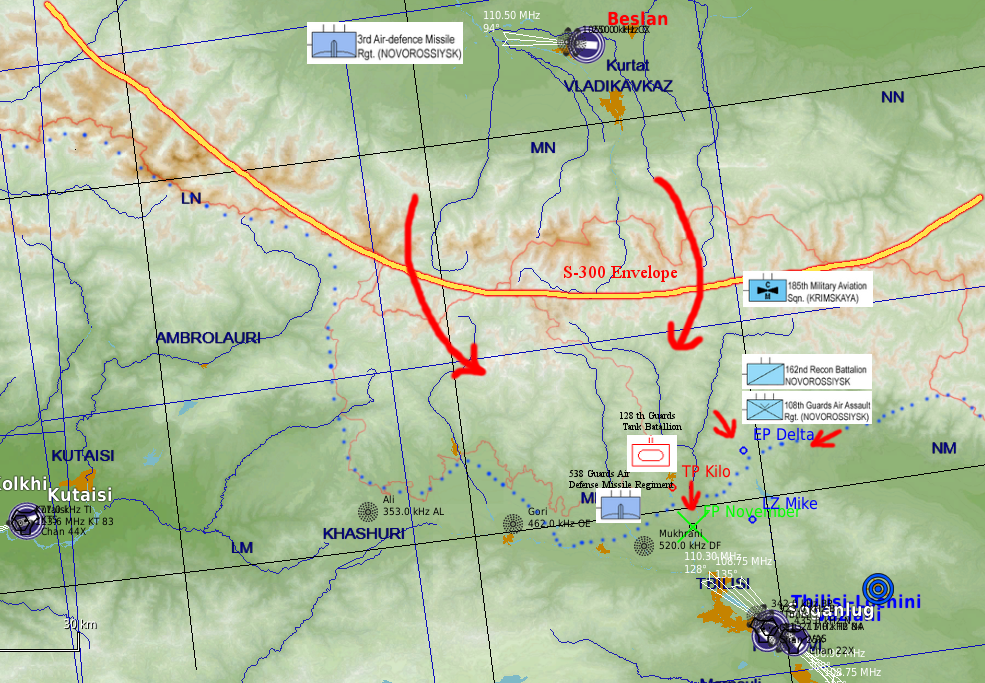
Juliet: Large Russian unit of infantry, armor, artillery and air defense. At least one SA-15 Tor and multiple Tunguskas confirmed. Other SAMs and Shilkas sighted. Exercise caution when approaching. SA-15 Tor is located on high ground. Remember, it is a low to medium altitude SAM system.
Mission deployment time: December 29, 1335D.
BLUFOR Bullseye: city of Zugdidi.
OPFOR Bullseye: position of Romeo.
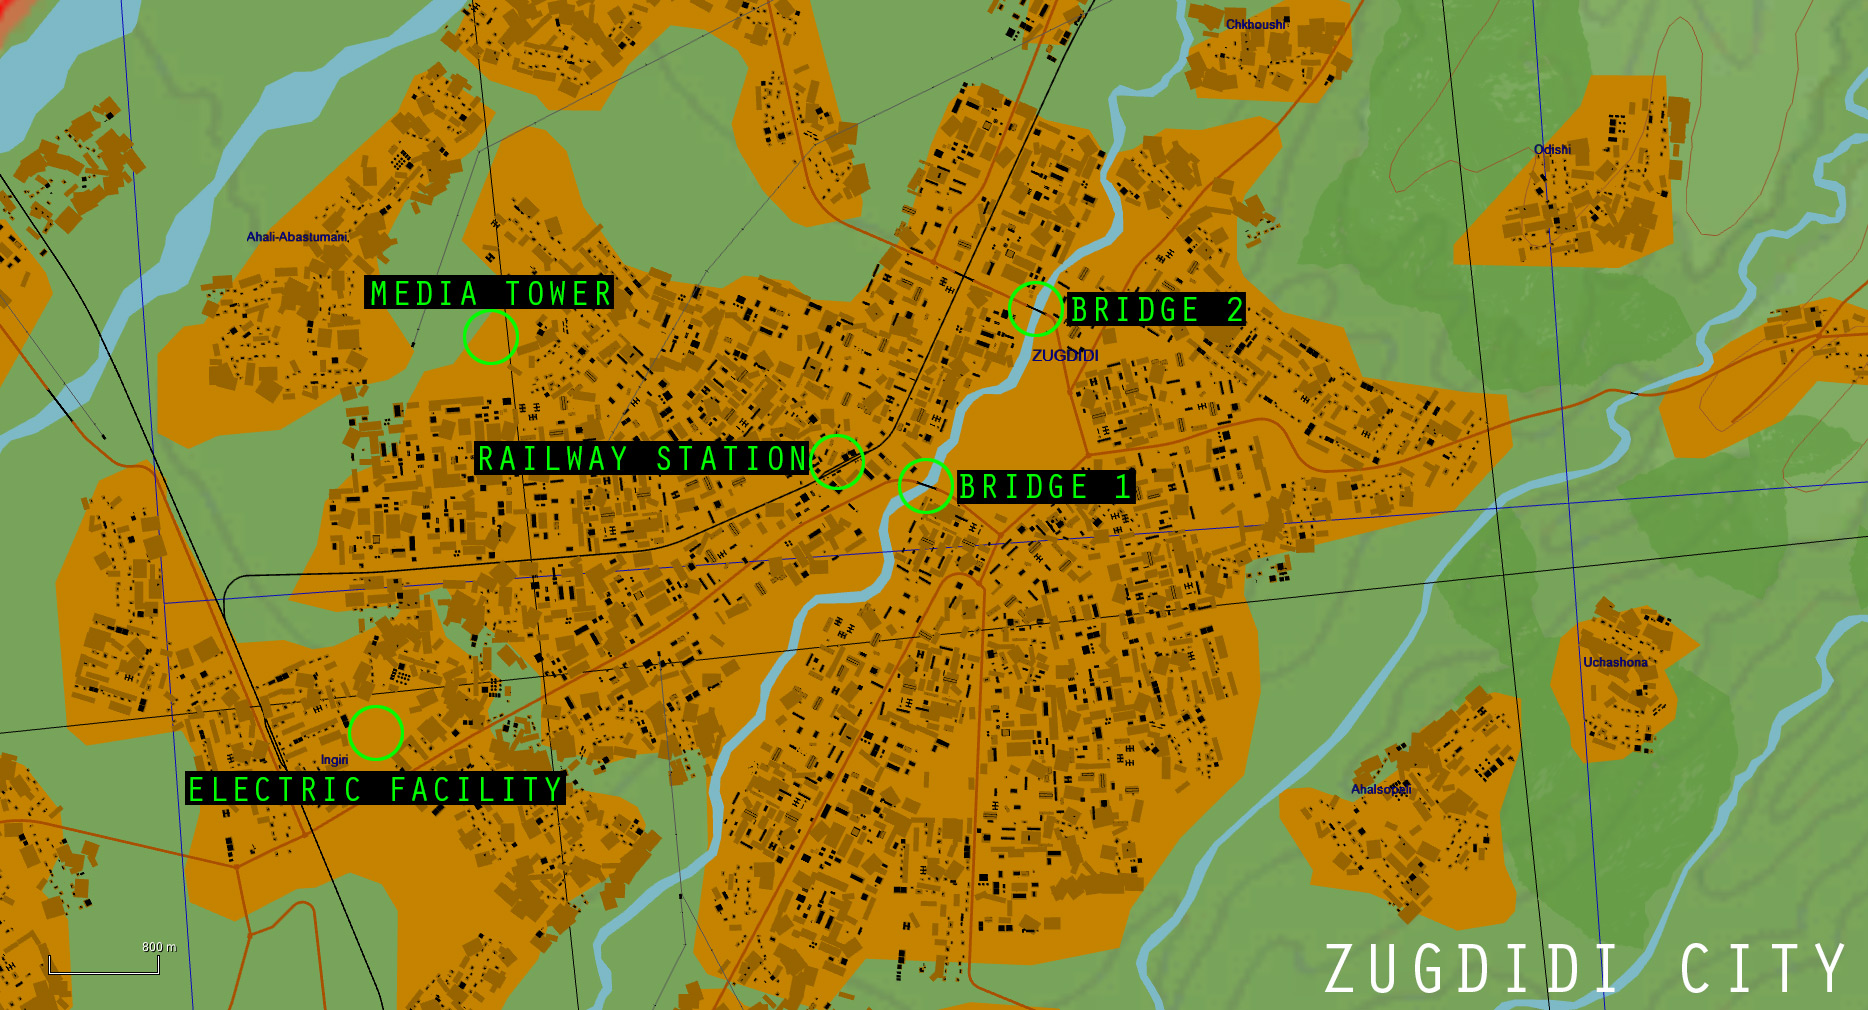
*** ZUGDIDI CITY IS NEUTRAL AND OF UTMOST IMPORTANCE TO EACH SIDE, CAPTURE THIS CITY AT ALL COSTS ***
RED TASKING:
RADIO CHANNELS:
ATC: 249.000 within a 30nm/50km range of your airbase
WP1 = BULLS EYE
(SENAKI-KOLKHI AFB is NEUTRAL, capturing that airbase will give you A2A IR ONLY at that airbase ONLY!)
JTAC1 and JTAC2 drones available.
Enemy also has 2 drones, take them out.
25 points per drone.
OPFOR Flights:
White Flight (4xSu-27, Sochi-Adler)
WP2 – Sukhumi, WP3 – Romeo/Bullseye, WP4 – FAF Sochi-Adler.
Damascus Flight (2xSu-33, CV Admiral Kuznetsov)
WP2 – Romeo/Bullseye, WP3 – FAF CV Admiral Kuznetsov.
Blue Flight (2xMiG-29S, Nalchik)
Golem Flight (2xSu-25T, Nalchik)
WP2 – Romeo/Bullseye.
OBJECTIVES:
FIGHTERS:
– Destroy the US reconnaissance drones orbiting in the AO (Sukhumi-Romeo-Zugidi);
– Intercept any BLUFOR aerial operations;
– Support STRIKERS
– Survive.
STRIKERS:
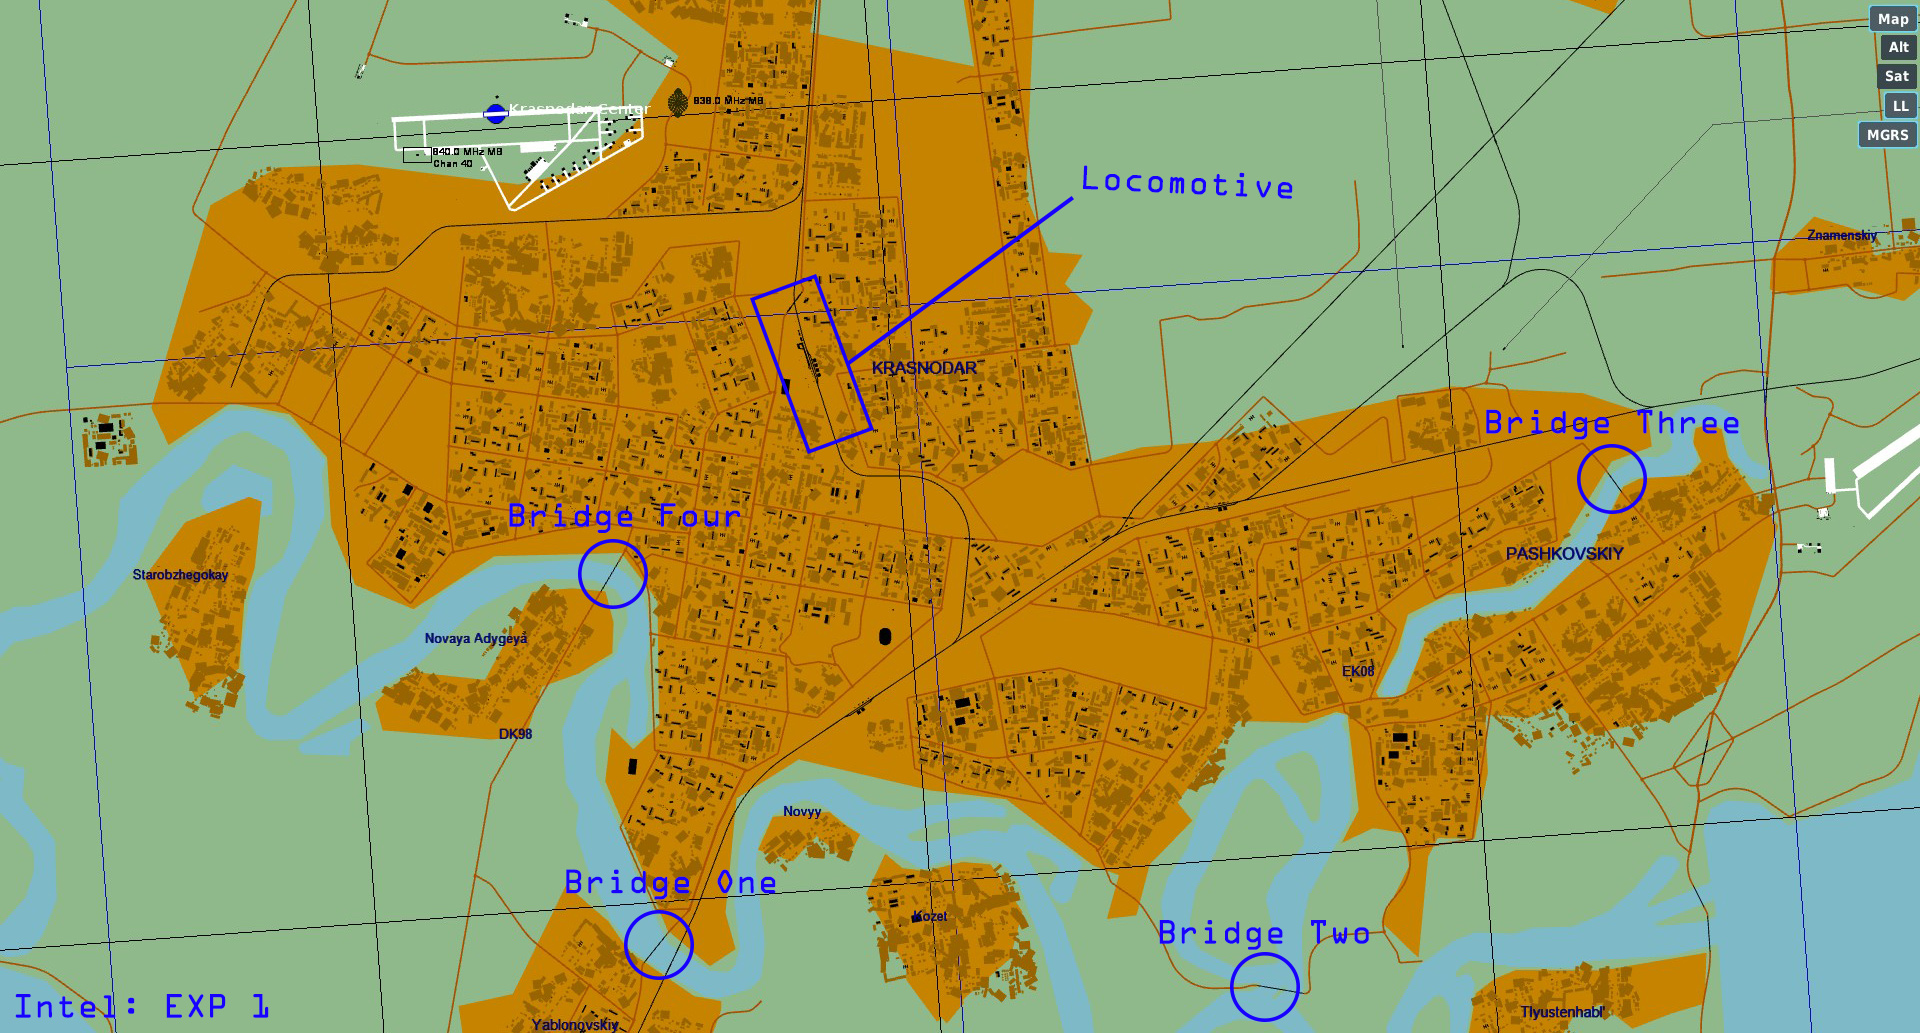
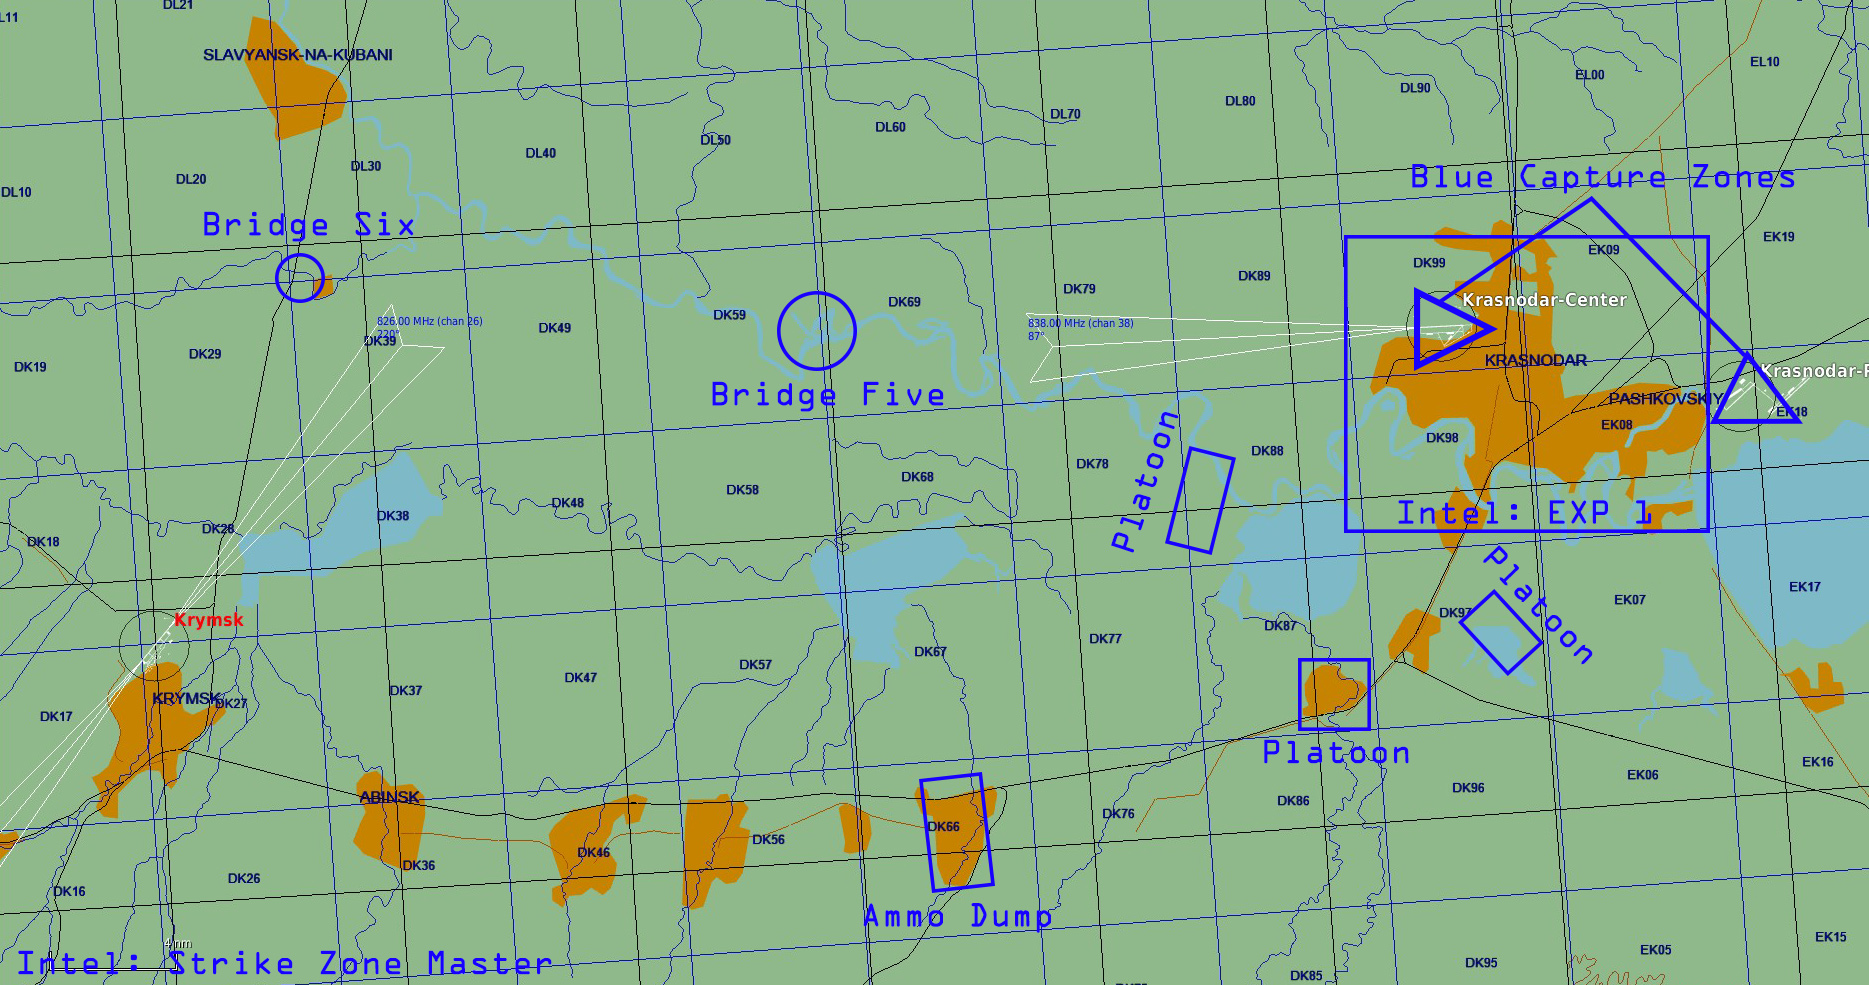
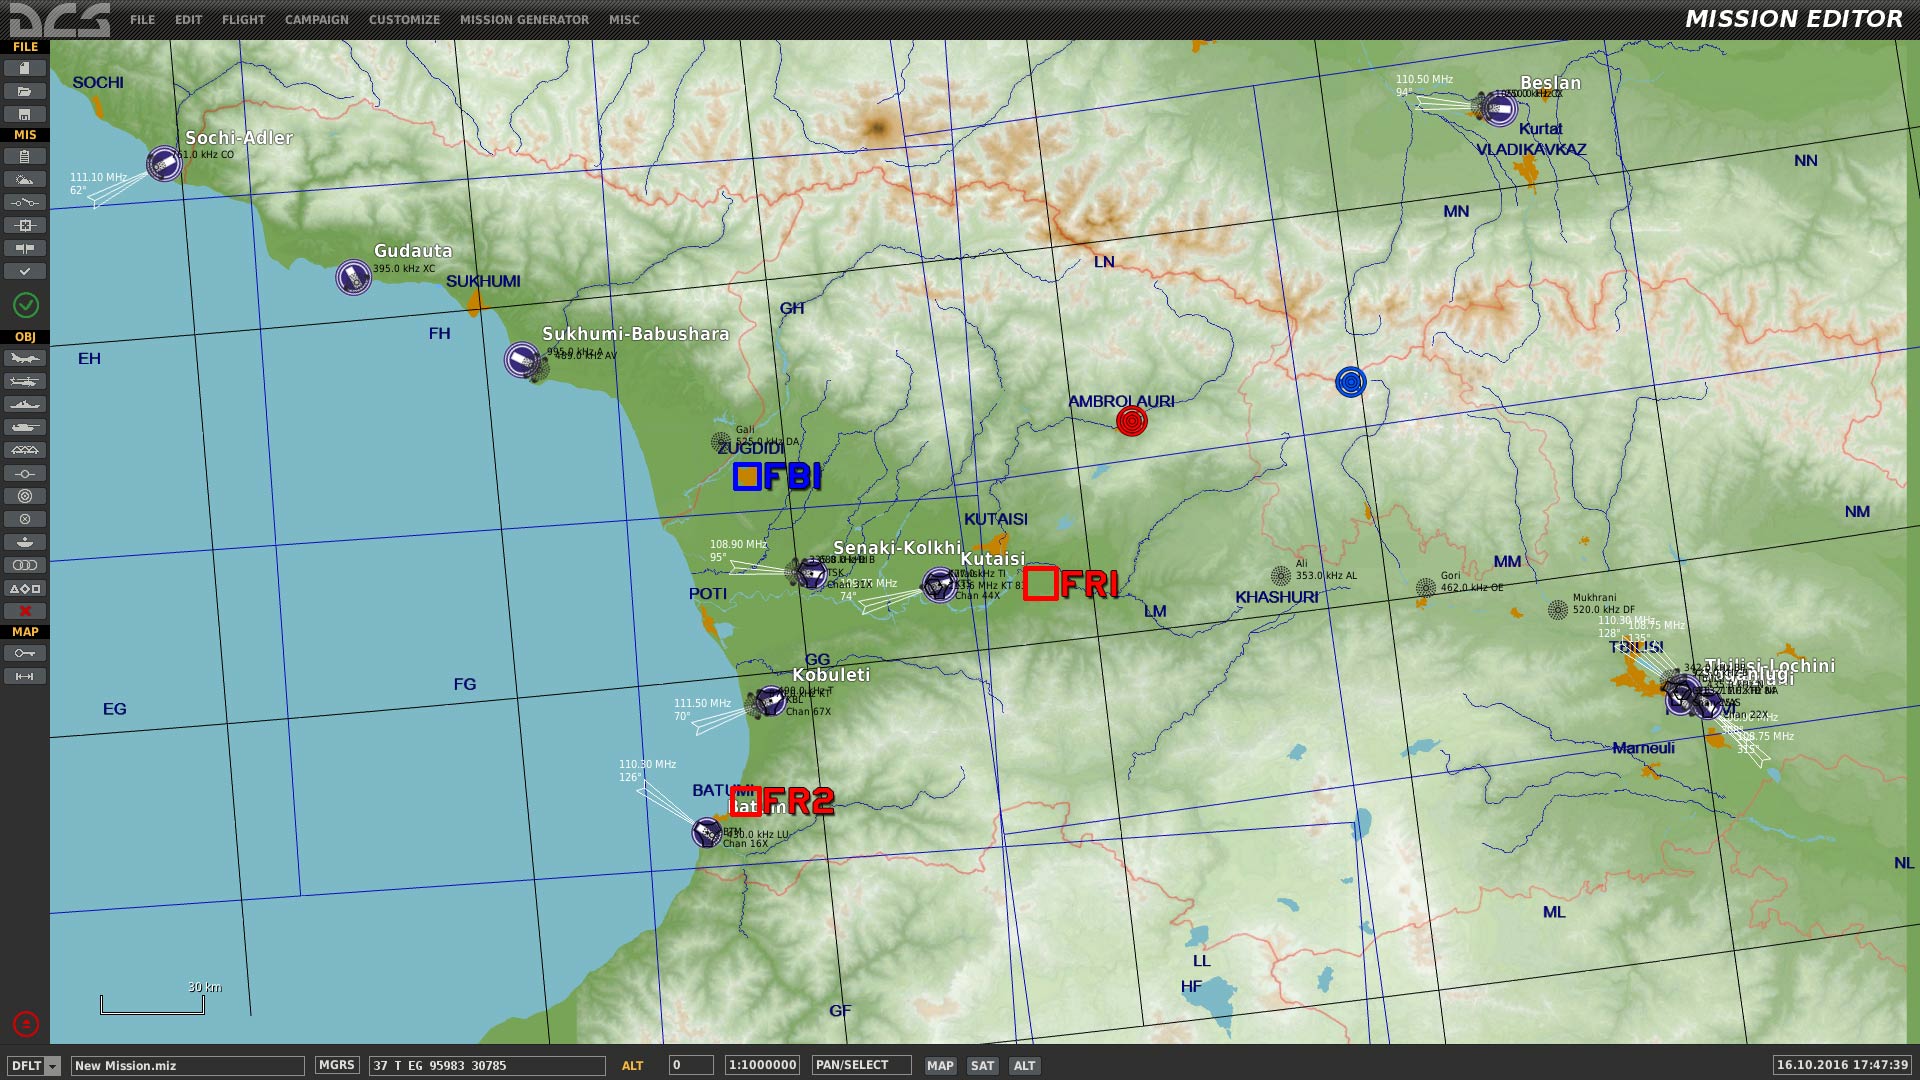
Primary: 3 platoons @
38 T KP 69771 13240 = 125 points – BLUE PLATOON 1
38 T LP 31596 06536 = 200 points – BLUE PLATOON 2
38 T KN 61251 24190 = 400 points – BLUE PLATOON 3
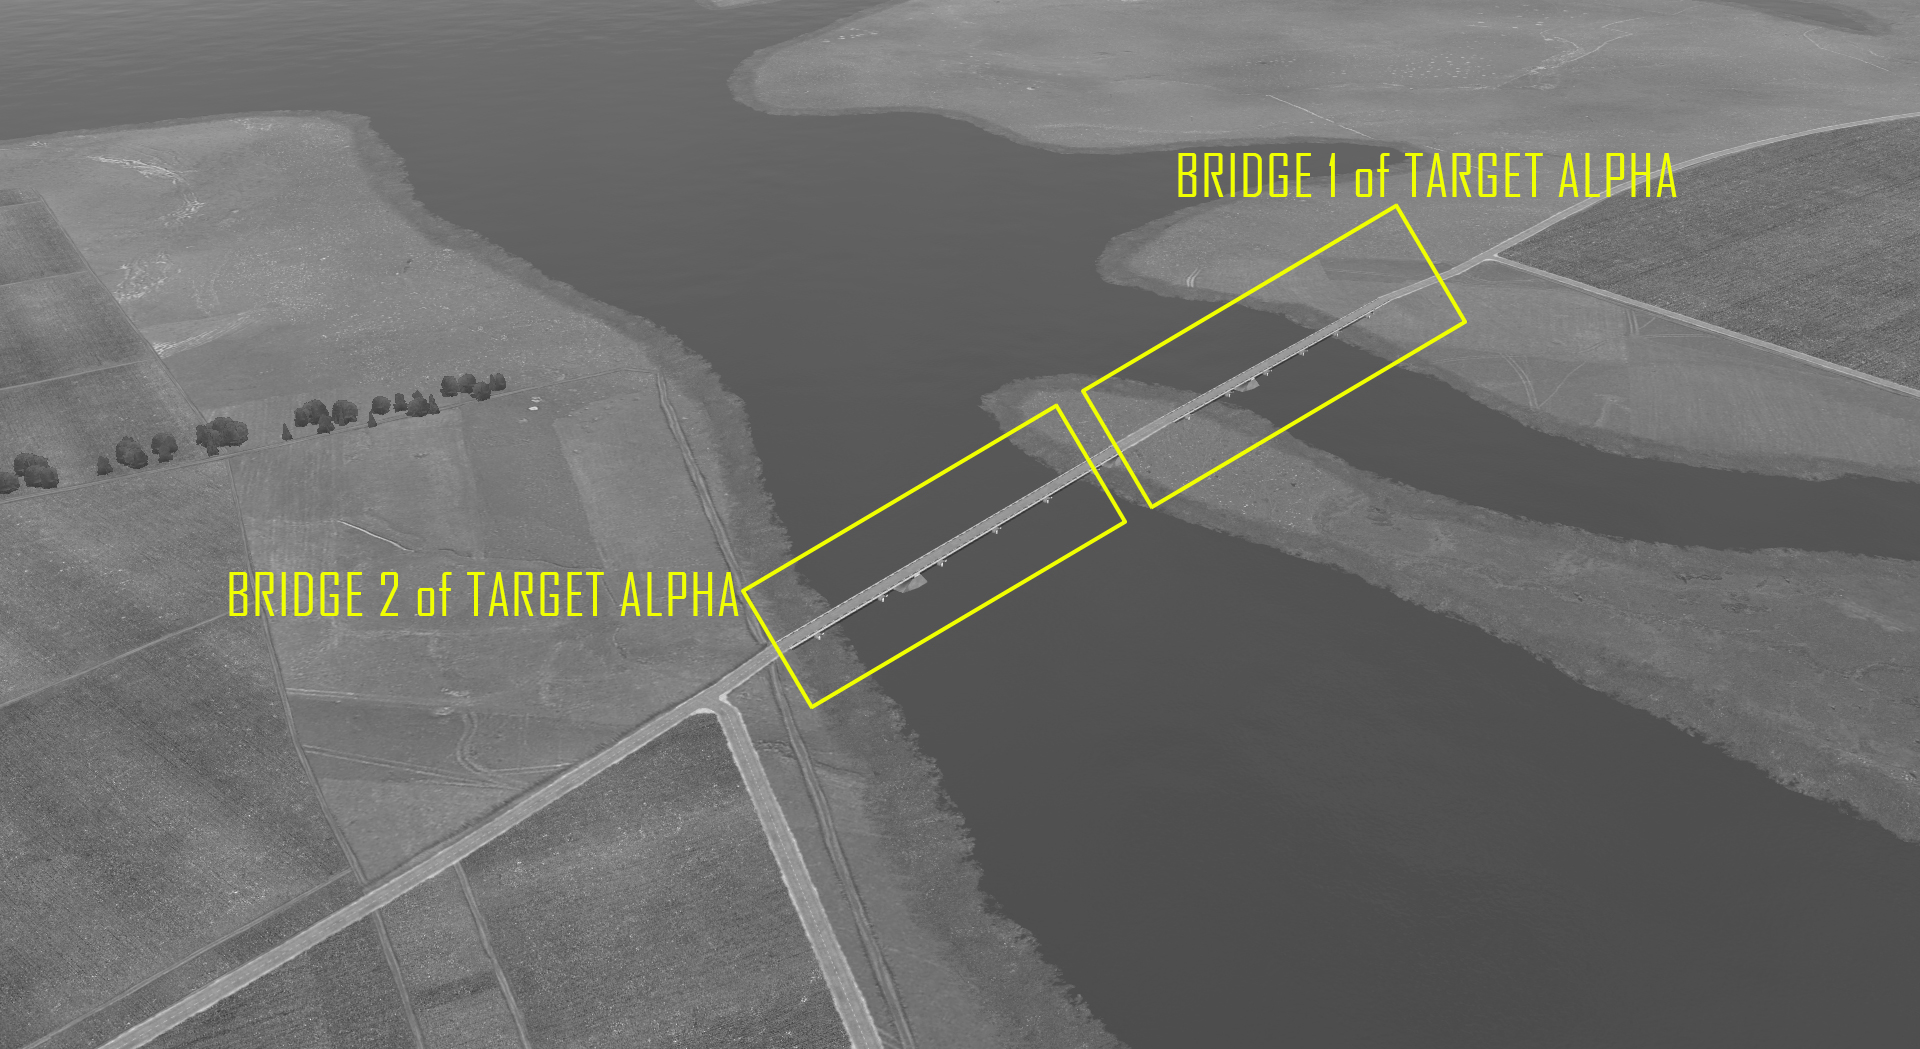
Secondary: Take out important bridge at waypoint 2 = 250 points
Tertiary: Take out BLUE PLATOON 3 at waypoint 3 = 350 points
SHIP STRIKES: @ 37 T FG 14256 29499
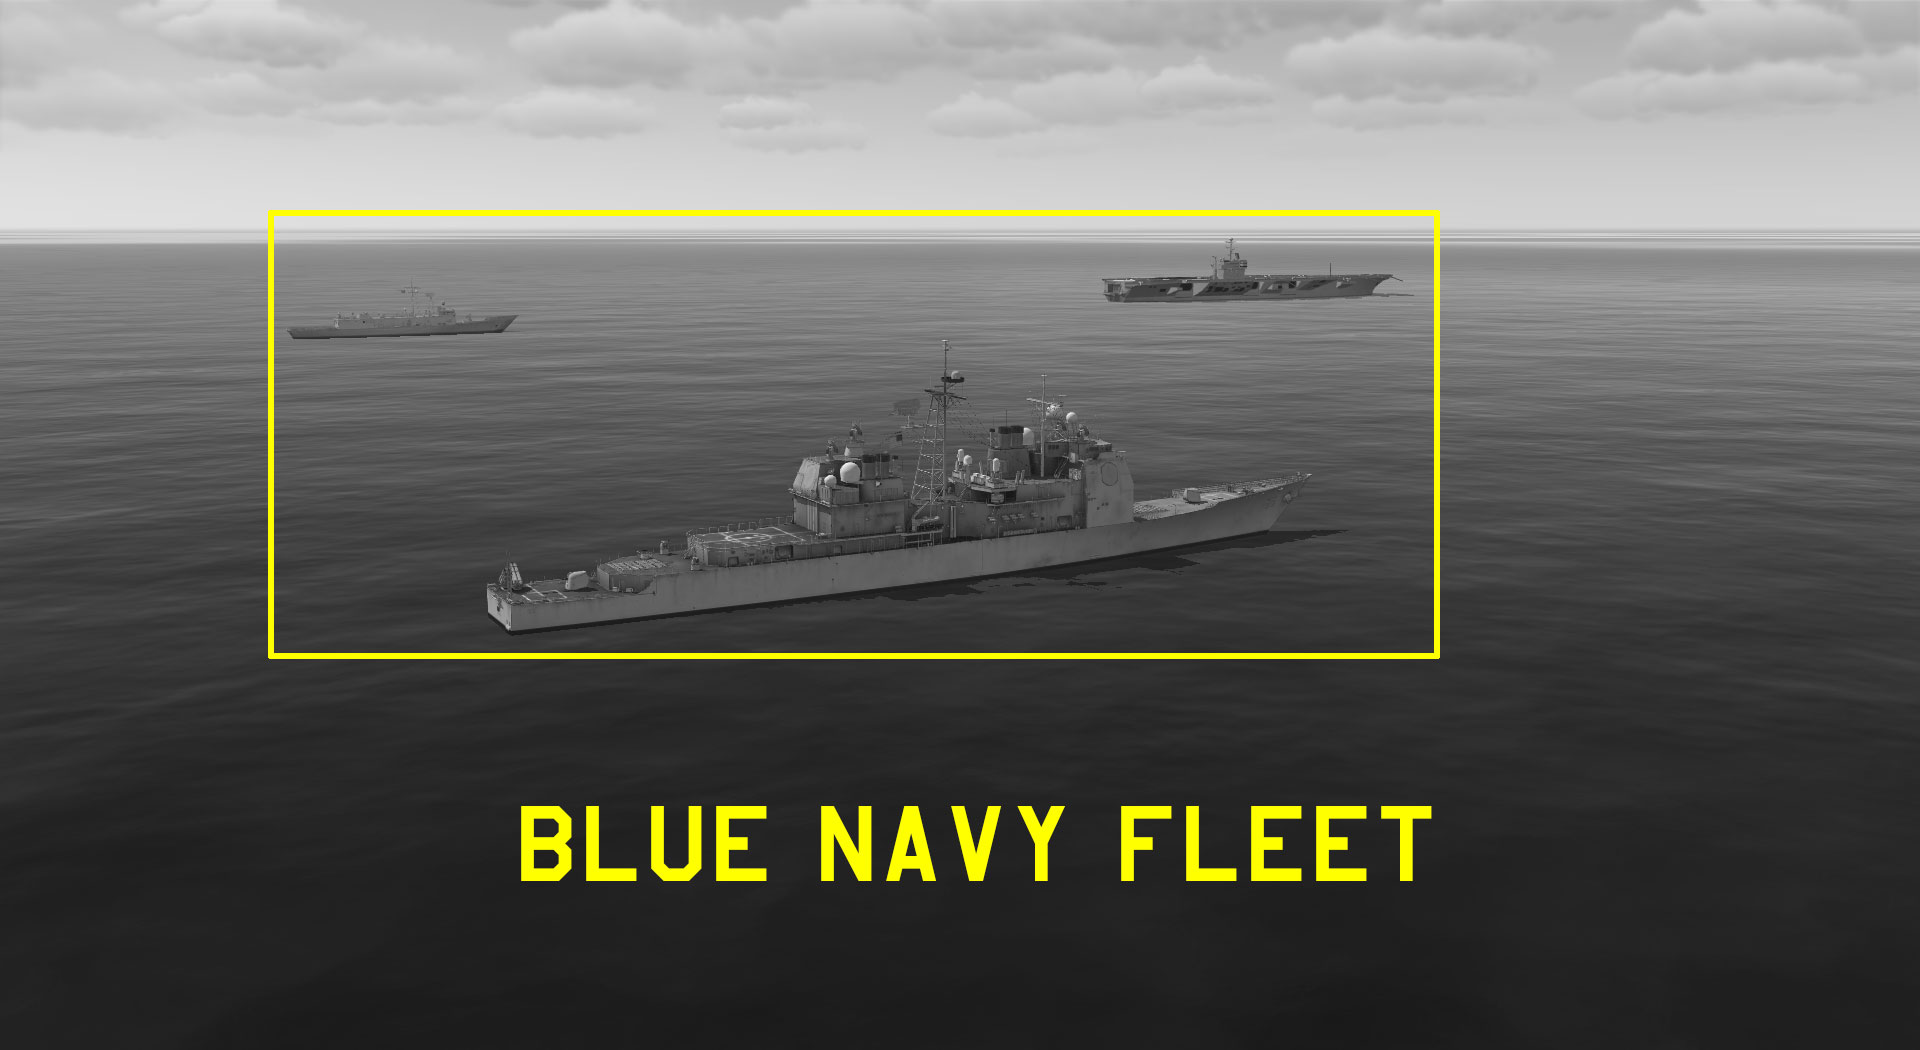
Carrier VINSON = 350 points
Ship REZKY = 150 points
Ship MOLNIYA = 150 points
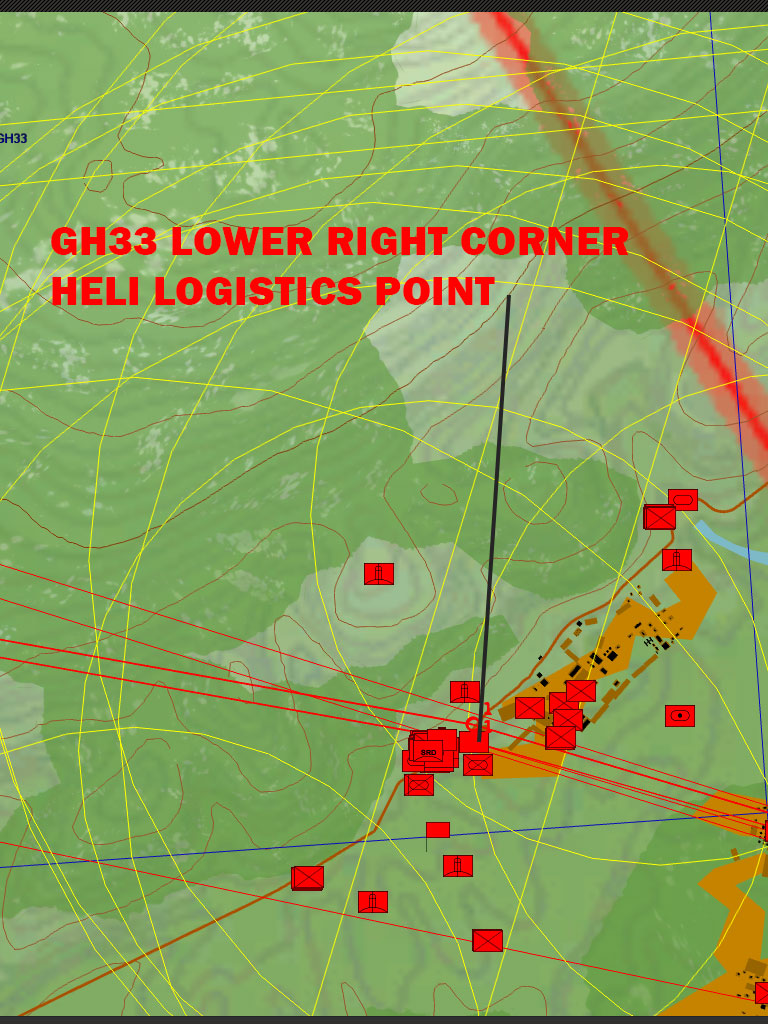
HELICOPTERS:
Use CTLD and CSAR menu
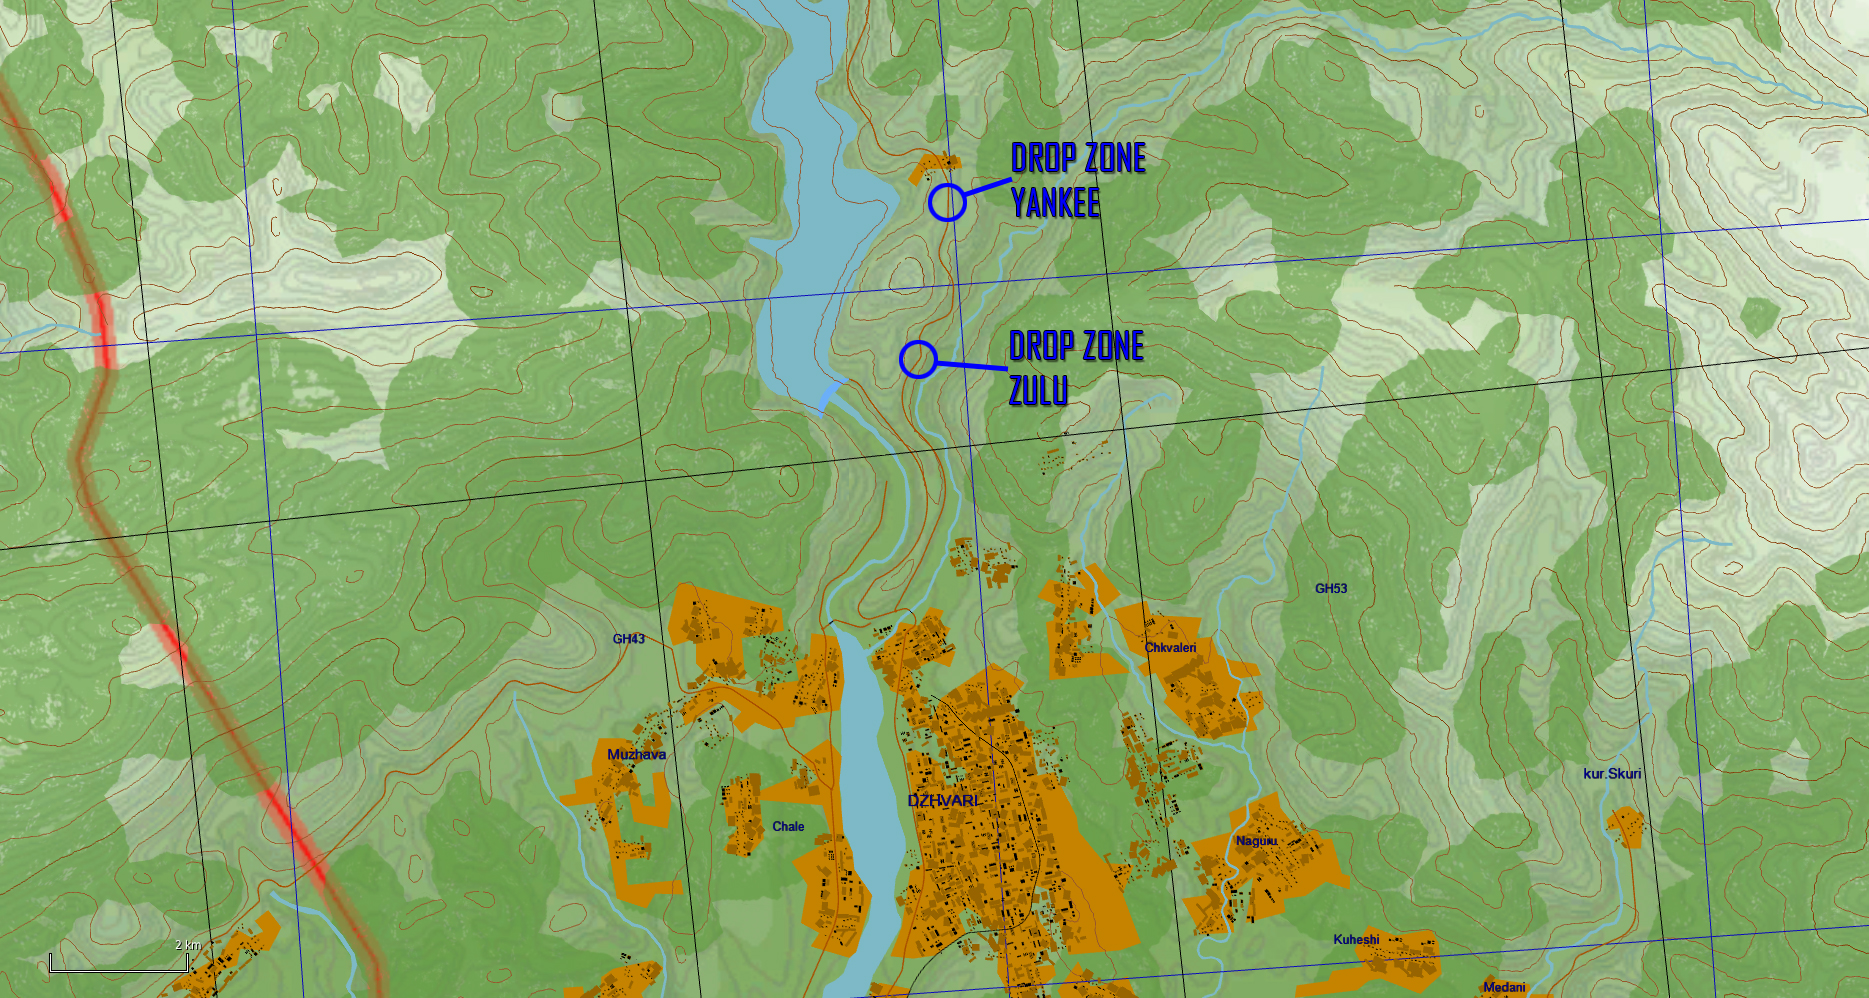
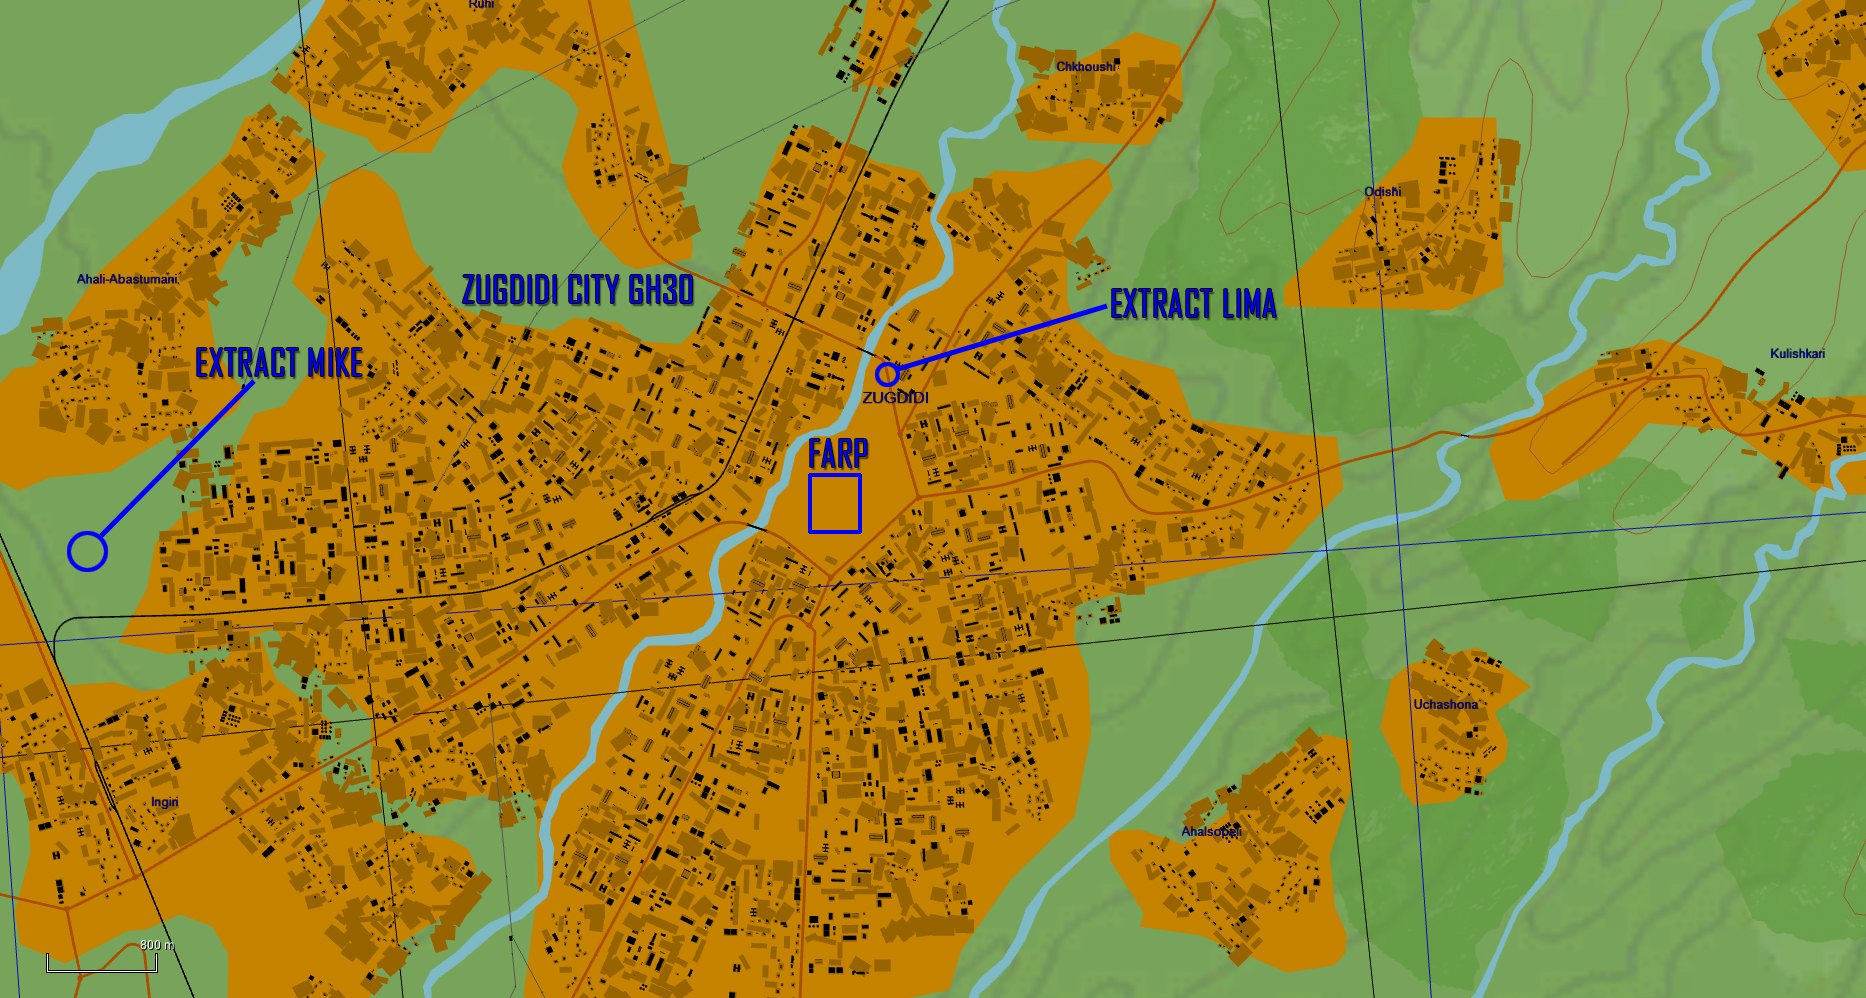
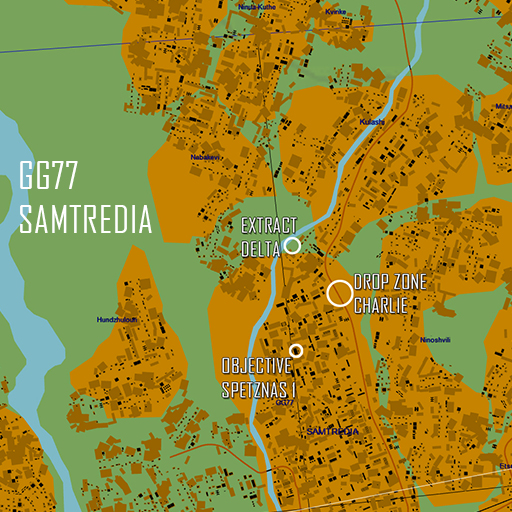
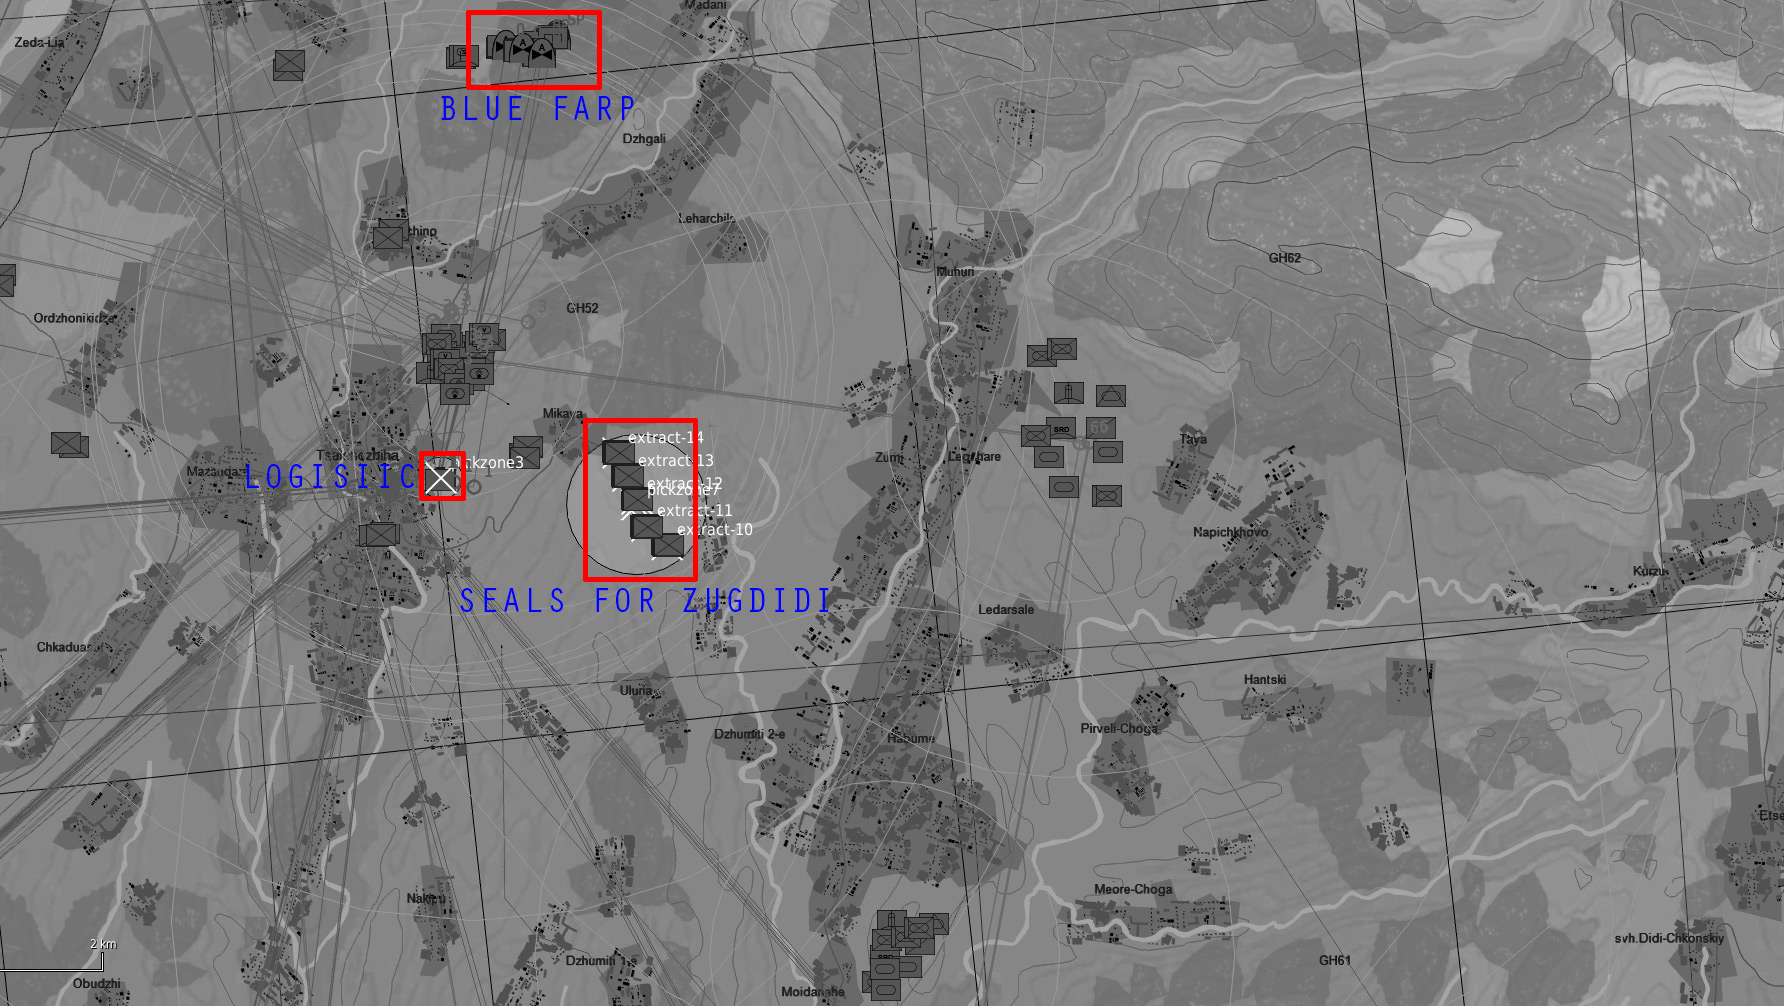
TASK 1: Capture ZUGDIDI CITY by dropping Spetsnaz, who you can pickup at the HELI LOGISTIC POINT via F10 MENU
All 5 locations in ZUGDIDI need to have friendly troops to consider it captured.
WAYPOINT 1 and 2 are LOGISTIC LOCATIONS
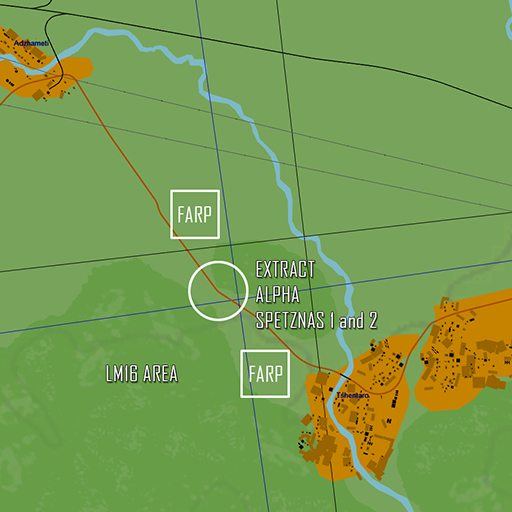
FARP 1 = NO LOGISTIC ONLY SPAWN/AMMO/REFUEL
FARP 2 = NO SPAWN, IS LOGISTIC LOCATION, HAS AMMO/FUEL (@WAYPOINT 2)
FARP 2 is poorly defended by friendly forces, but closer to the action.
Pickup SAMs, AAA systems to increase our air defenses, also you can setup EWR to give the coalition more eyes.
Chopper Logistics Point @ WP1: 37 T GH 37954 30663
Perform CSAR for downed pilots, each rescued pilot = 50 points
Capturing airbase Senaki-Kolkhi = 100 points
Airbases can be captured 3 times max, each capture will spawn 1 x AAA , 1 x Short Range SAM, 1 x Ammo truck.
AERIAL REFUEL:
Between LN72 – FJ26 TANKER TEXACO is flying, frequency 251.900 AM
BLUE TASKING:
RADIO CHANNELS:
ATC: 249.000 within a 30nm/50km range of your airbase
WP3 = BULLS EYE
(SENAKI-KOLKHI AFB is NEUTRAL, capturing that airbase will give you IR ONLY A2A at that airbase ONLY!)
JTAC3 and JTAC4 drones available.
Enemy also has 2 drones, take them out.
25 points per drone.
BLUFOR Flights:
Zeus Flight (8xF15C, Batumi)
WP2 – Poti, WP3 – Zugidi/Bullseye, WP4 – FAF Senaki-Kolkhi, WP5 – FAF Batumi.
Titan Flight (8xA10C, Kobuleti)
Silver Flight (2xA10A, Kobuleti)
WP2 – Poti, WP3 – Zugidi/Bullseye, WP4 – BLUFOR Armor position, WP5 – FAF Senaki-Kolkhi, WP6 – FAF Kobuleti.
Ghost Flight (8xKa-50, Kutaisi)
WP1 – BLUFOR Armor position, WP2 Objective 1, WP3 Objective 2
FARP frequency LONDON 127.5
FARP frequency DALLAS 128.5
Spirit Flight (2xSu-27, 2xMiG-29S, Kutaisi)
Frog Flight (2xSu-25, Kutaisi)
WP2 – FAF Senaki-Kolkhi, WP3 – Zugdidi/Bullseye, WP4 – BLUFOR Armor position, WP5 – FAF Kutaisi.
Kilgore Flight (2xUH-1H, Kobuleti)
WP1 – Senaki-Kolkhi, WP2 – Zugidi/Bullseye, WP3 – BLUFOR Armor position, WP4 – Kobuleti.
OBJECTIVES:
STRIKERS:
Primary objectives:
Destroy 3 platoons @
38 T KP 65367 18473 = 125 points – RED PLATOON 1
37 T GJ 18412 60276 = 200 points – RED PLATOON 2
37 T GH 42441 34035 = 400 points – RED PLATOON 3
-Destroy the bridge connecting Romeo and Juliet to delay the Russian advance and leave Romeo stranded between a mountain, a river and BLUFOR armor;
—- BRIDGE: 250 points —-
SHIP STRIKES: @ 37 T FH 15265 20667
Carrier KUZNETSOV = 350 points
Ship REZKY = 150 points
Ship MOLNIYA = 150 points
-Attack Romeo and deal any damage possible;
-Intercept any OPFOR aerial operations;
-Survive.
Secondary objectives:
-Destroy the units protecting the bridge;
-Attack Juliet.
Note: Excercise extreme caution when proceeding with Juliet. At least one SA-15 Tor and multiple Tunguskas sighted.
HELICOPTERS:
Use CTLD and CSAR menu
TASK 1: Capture ZUGDIDI CITY by dropping NAVY SEALS, who you can pickup near the HELI LOGISTIC POINT via F10 MENU
All 5 locations in ZUGDIDI need to have friendly troops on the ground to consider it captured.
WAYPOINT 1 and 2 are LOGISTIC LOCATIONS
FARP 1 = NO LOGISTIC ONLY SPAWN/AMMO/REFUEL
FARP 2 = NO SPAWN, IS LOGISTIC LOCATION, HAS AMMO/FUEL (@WAYPOINT 2)
FARP 2 is poorly defended by friendly forces, but closer to the action.
Pickup SAMs, AAA systems to increase our air defenses, also you can setup EWR to give the coalition more eyes.
Chopper Logistics Point @ WP1: 38 T KN 60718 22596
Perform CSAR for downed pilots, each rescued pilot = 50 points
Capturing airbase Senaki-Kolkhi = 100 points
Airbases can be captured 3 times max, each capture will spawn 1 x AAA , 1 x Short Range SAM, 1 x Ammo truck.
AERIAL REFUEL:
Between LN72 – GJ80 TANKER TEXACO is flying, frequency 251.800 AM